How RAW is "RAW"?
Understanding RAW Image Data: How unprocessed is a RAW file?
Introduction
Cameras that address experienced users, such as D-SLR and system cameras, normally offer a RAW-Mode. In this mode, the camera puts files onto the memory device, that are called “Raw”-Files, as they contain the pure data which was obtained from the sensor and has not been processed.
At least that is what these files are considered to be. The important question is:
At a Glance
RAW files are not always pure sensor output. Although RAW formats are intended to contain minimally processed image data, manufacturers often apply corrections and optimizations before saving the file.
Different cameras process RAW data differently. Measurements of camera response curves (OECF) show that identical scene information can be modified in different ways depending on the manufacturer and camera model.
Noise reduction can affect RAW files. Features such as dark-current compensation and long-exposure noise reduction may alter RAW data before it is written to the memory card.
Hidden processing may occur even when image enhancements are disabled. Experimental testing shows that some cameras still apply undocumented modifications to RAW files, even when noise reduction settings are turned off.
Comparing camera quality using RAW data is challenging. Since every manufacturer defines its own RAW processing pipeline, the "rawness" of RAW files varies, making direct comparisons between camera systems difficult.
Key takeaway: RAW files provide significantly more original sensor data than JPEG images, but they are not necessarily untouched sensor output. The question remains: How raw is RAW?
“How raw is RAW?“
In our experience, we can say: The files are as raw as the manufacturer wants them to be.
Some examples:
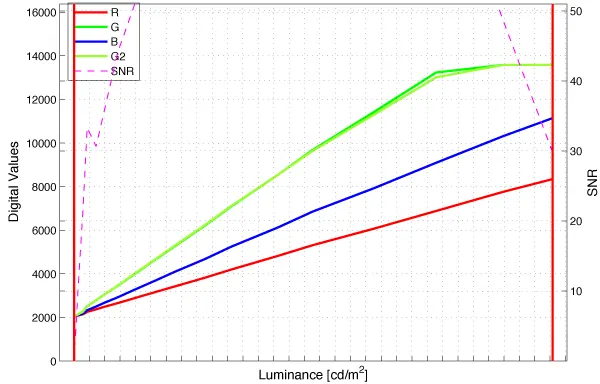
In the iQ-Analyzer, we can extract the data from the RAW files and use them for our measurements. Let’s take a look at the OECF (Opto-Electronic Conversion Function) of two different cameras (Canon 7D and Nikon D7000).
We see that the OECFs are different. One camera shows values close to zero in the dark areas, the other one does not. So does one of these cameras have no dark current? I don’t think so, most likely the dark current has been compensated in one camera and not in the other. So RAW is not the pure sensor output, it has already been modified in its tonal range.
Another example:
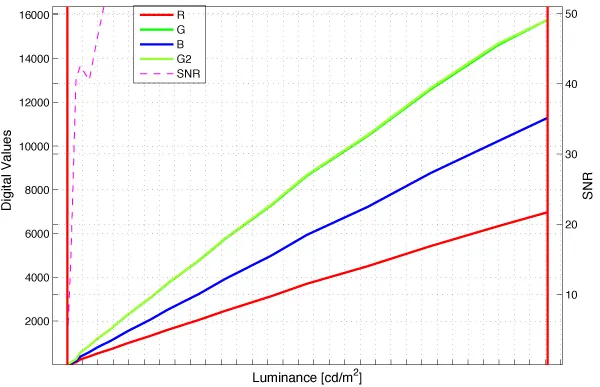
In the iQ-Analyzer, we can extract the data from the RAW files and use them for our measurements. Let’s take a look at the OECF (Opto-Electronic Conversion Function) of two different cameras (Canon 7D and Nikon D7000).
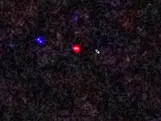
We see that the OECFs are different. One camera shows values close to zero in the dark areas, the other one does not. So does one of these cameras have no dark current? I don’t think so, most likely the dark current has been compensated in one camera and not in the other. So RAW is not the pure sensor output, it has already been modified in its tonal range.This test has been performed with a Nikon D3x. The images have been taken in complete darkness with a really long exposure time (several minutes) to show the effect of dark current.
The user can decide if a dark current compensation for long exposure times is wished or not. So if we turn the compensation off, we get colorful images, which show us the noise due to the dark current.
If we turn the compensation on, the camera automatically starts a second exposure right after the first one, without opening the shutter and lasting just as long as the first one. The obtained image is used to correct the first one. The result is a significant lower noise; the corrected image is nearly black.
Interestingly, we can have a third mode, which is not documented. To get this, we turn the camera off while it exposes the second image. So take an image and turn it off directly after the shutter has been closed. The camera will save the first image into the memory device without the correction with the second one. In this case, it shows even more noise compared to the images we have taken without the compensation. So this is an indicator, that also the images we have taken with compensation turned off, have been modified with some kind of processing.
To make sure that this is not only an effect in the JPEG files, we had a look at the RAW files and could make the same observation: The noise is different in the three images, so there has been some processing on the RAW files.
So we see: The files are as raw as the manufacturer wants them to be.
If a manufacturer leaves the image rawer than its competitors, this can mean worse noise results in the RAW file compared to another manufacturer who already somehow processes the files. A fair comparison and judgment of the quality of the camera is extremely hard to do on RAW, as you never know: How raw is RAW?
About this article:
Written by the Image Engineering R & D team. Technical review: Uwe, Artman. Last updated: 2026 . Image Engineering is an independent test lab for camera image quality and the developer and manufacturer of the complete test infrastructure, including test charts, analysis software, and measurement equipment.